How to Make Fall Leaf Garland
Materials You’ll Need:
- Fall Leaves: Gather vibrant leaves that are still somewhat pliable and haven’t started to curl or crumble.
- Twine, Rope, or Ribbon: This will be the base of your garland.
- Jewelry Pliers, Scissors, or a Hole Punch: For creating holes in the leaves.
- A Hot Glue Gun (optional): An alternative to stringing the leaves.
- Materials for Preserving Leaves: Choose one of the methods below.
Step 1: Gather and Prepare Your Leaves
Go on a nature walk and collect a variety of leaves in different colors, shapes, and sizes. Look for leaves that are free of tears or blemishes. It’s best to use leaves that have just fallen and are still soft, as they are less likely to crack. Once you have your collection, wipe them clean of any dirt.
Step 2: Preserve the Leaves
This is the most important step for ensuring your garland lasts. Without preservation, the leaves will quickly dry out, become brittle, and lose their color.
Method 1: Wax Paper Pressing (Easiest) This method is simple and great for a quick craft.
- Place a leaf between two sheets of wax paper.
- Cover the wax paper with a thin towel or a piece of parchment paper.
- Set your iron to a medium heat with no steam.
- Carefully press and move the iron over the towel until the wax paper melts and seals around the leaf. The wax will give the leaf a slightly glossy, preserved look.
- Let the “sandwich” cool, then cut around the leaf, leaving a small margin of wax paper to keep it sealed.
Method 2: Beeswax or Paraffin Wax Dipping This method results in a glossy, durable finish.
- Use a double boiler or a heat-safe bowl over a pot of boiling water to melt the beeswax or paraffin wax. Do not put the wax directly on a heat source.
- Holding the leaf by its stem, carefully dip it into the melted wax, coating both sides.
- Lift the leaf and let the excess wax drip off.
- Lay the waxed leaves on a sheet of wax paper to cool and harden, which only takes a few minutes.
Method 3: Mod Podge Coating This method is easy and gives the leaves a shiny, sealed surface.
- Using a foam brush, apply a thin, even layer of Mod Podge (a sealant and adhesive) to one side of a leaf.
- Lay the leaf down on a covered surface with the Mod Podge side up and let it dry.
- Once the first side is dry, turn the leaf over and repeat on the other side.
- This will result in a flexible, sturdy leaf that retains its color well.
Step 3: Assemble the Garland
Once your leaves are preserved and completely dry, it’s time to create the garland.
Option 1: Stringing the Leaves This is the most traditional method.
- Cut your twine or ribbon to the desired length, leaving extra on each end for hanging.
- Use a small hole punch or the sharp end of a pair of scissors to carefully poke a small hole through the top of each leaf, near the stem.
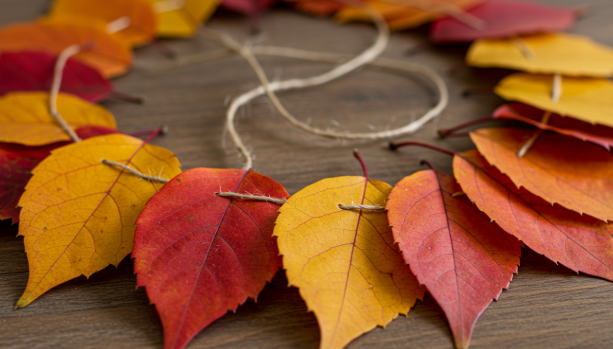
- Thread the twine through the holes. You can slide the leaves freely or tie a small knot on each side of a leaf to keep it in place.
- Continue stringing the leaves, alternating shapes and colors, until you are happy with the look.
Option 2: Gluing the Leaves This method is quick and works well for a denser garland.
- Lay your twine or ribbon out on a flat surface.
- Using a hot glue gun, place a small dab of glue on the back of each leaf’s stem.
- Press the stem onto the twine, holding it in place until the glue dries.
- Vary the placement of the leaves—some facing up, some down, and some overlapping—to create a full, natural look.
Your beautiful, handcrafted fall leaf garland is now ready to be hung on a mantel, above a window, or anywhere you want to add a touch of autumn magic!